Retrieval-Augmented Generation (RAG) lets you enhance large language model (LLM) applications by supplementing your users’ prompts with context from internal sources. For instance, you may want to provide an internal chatbot to your employees. If a user asks “How do I get promoted?”, the chatbot can enrich the general guidance from the company handbook with personalized information from their most recent review and notes from their 1:1s with their manager.
But this power introduces new complexity to your company’s authorization posture. The source material that you provide as context to the chatbot is governed by access controls. If the chatbot isn’t aware of those controls, it will leak sensitive information.
In this post, we’ll use Oso Cloud, Supabase, and OpenAI to build a permissions-aware RAG chatbot that only shares information with users that they’re authorized to see. The full source code is here.

What you’ll learn
After reading this post, you’ll know how to:
- Use Supabase to initialize and populate a vector database
- Use Open AI to
- convert documents and prompts to vector embeddings
- generate chatbot responses
- Use Oso Cloud to filter the context sent to a RAG chatbot based on the user’s permissions
What’s more, you’ll learn how to do all of this in the context of a state-of-the-art command-line interface. If you weren’t excited before, I know you are now.
Let’s get started!
Scenario
Our chatbot is a bit of an introvert.
It will answer two questions:
- Why a specific employee (Bob) got a bad review
- When the company holidays are
It has two users:
- Diane - A member of the HR team who has access to all documents, including the private contents of employees’ reviews.
- Bob - A member of the Engineering team who just received a negative review. Part of the review feedback was from Alice, a coworker who said Bob is “horrible to work with.”
It can add context from three documents:
- Bob’s internal review - This contains all the feedback that Bob’s manager received about Bob, including Alice’s comment about Bob being horrible to work with. Only Diane can see information from this document.
- Bob’s external review - This is the review document that Bob’s manager shared with him. It only contains generalized feedback. Alice’s comment is omitted. Both Bob and Diane can see information from this document.
- Company holidays -This is just a list of company holidays. There is no sensitive information. Any user can see this information if they ask what the company holidays are.
When Diane asks the chatbot why Bob got a bad review, she should see all the supporting context, including Alice’s comment. When Bob asks, he should only see the more generalized feedback that was provided by his manager. Anybody can see when the company holidays are.
Components
The chatbot comprises three major technologies.
OpenAI
You’re reading an article about RAG chatbots, so I probably don’t have to tell you who OpenAI is. But I’m not the sort of person to let that stop me. They’re the AI company who built ChatGPT. Our chatbot uses their models for functionality that relies on LLMs.
Supabase
Supabase provides a composable application backend: storage, authentication, edge functions and more. The chatbot uses their postgresql vector database to store vector embeddings alongside application data.
Oso Cloud
Oso Cloud is authorization as a service. It lets you externalize authorization logic and provides APIs for checking permissions. The chatbot uses Oso Cloud to constrain the RAG context to the elements that the current user is allowed to see.
Data model
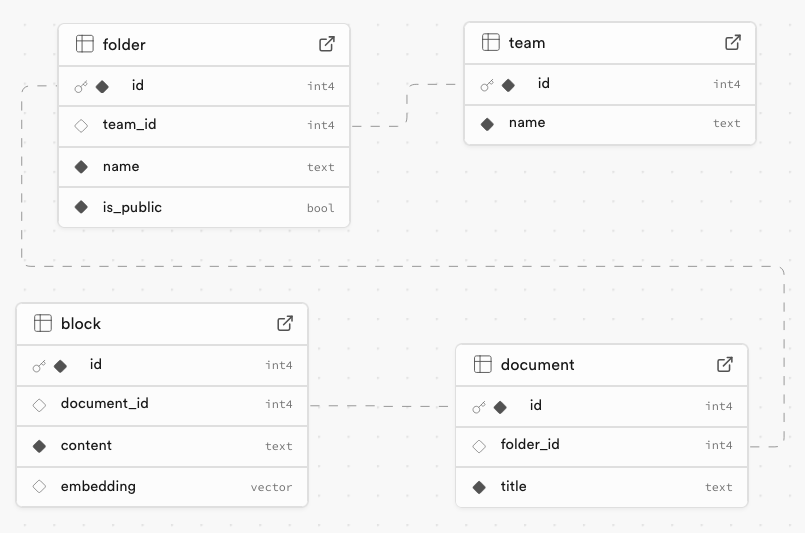
The chatbot rests atop a simplified content management system (CMS). The CMS defines the following entities:
- Teams - Each user belongs to a team. A user’s team determines which documents they’re allowed to view.
- Folders - Folders contain documents. Folders belong to teams. They can be public or private.
- Documents - Documents contain the data that the chatbot receives as context to the user’s prompt. Documents belong to Folders.
- Blocks - A Block is an individual piece of data contained in a Document. The application generates embeddings from Blocks. Each Block is associated with a Document.
How RAG works
Before we get into the code, let’s briefly describe how a RAG chatbot works. In a pre-trained chatbot, a user’s prompt is submitted directly to an LLM that has been trained on a large amount of data. The LLM analyzes the prompt and generates a response that is likely to fulfill the user’s request.

In a RAG chatbot, you store data from internal sources like documents and chat transcripts as vectors in an embeddings database. Before you send a prompt to the chatbot, you convert the prompt to a vector and use the vector to find the most relevant context from the embeddings database. You then send that context along with the prompt to the chatbot.
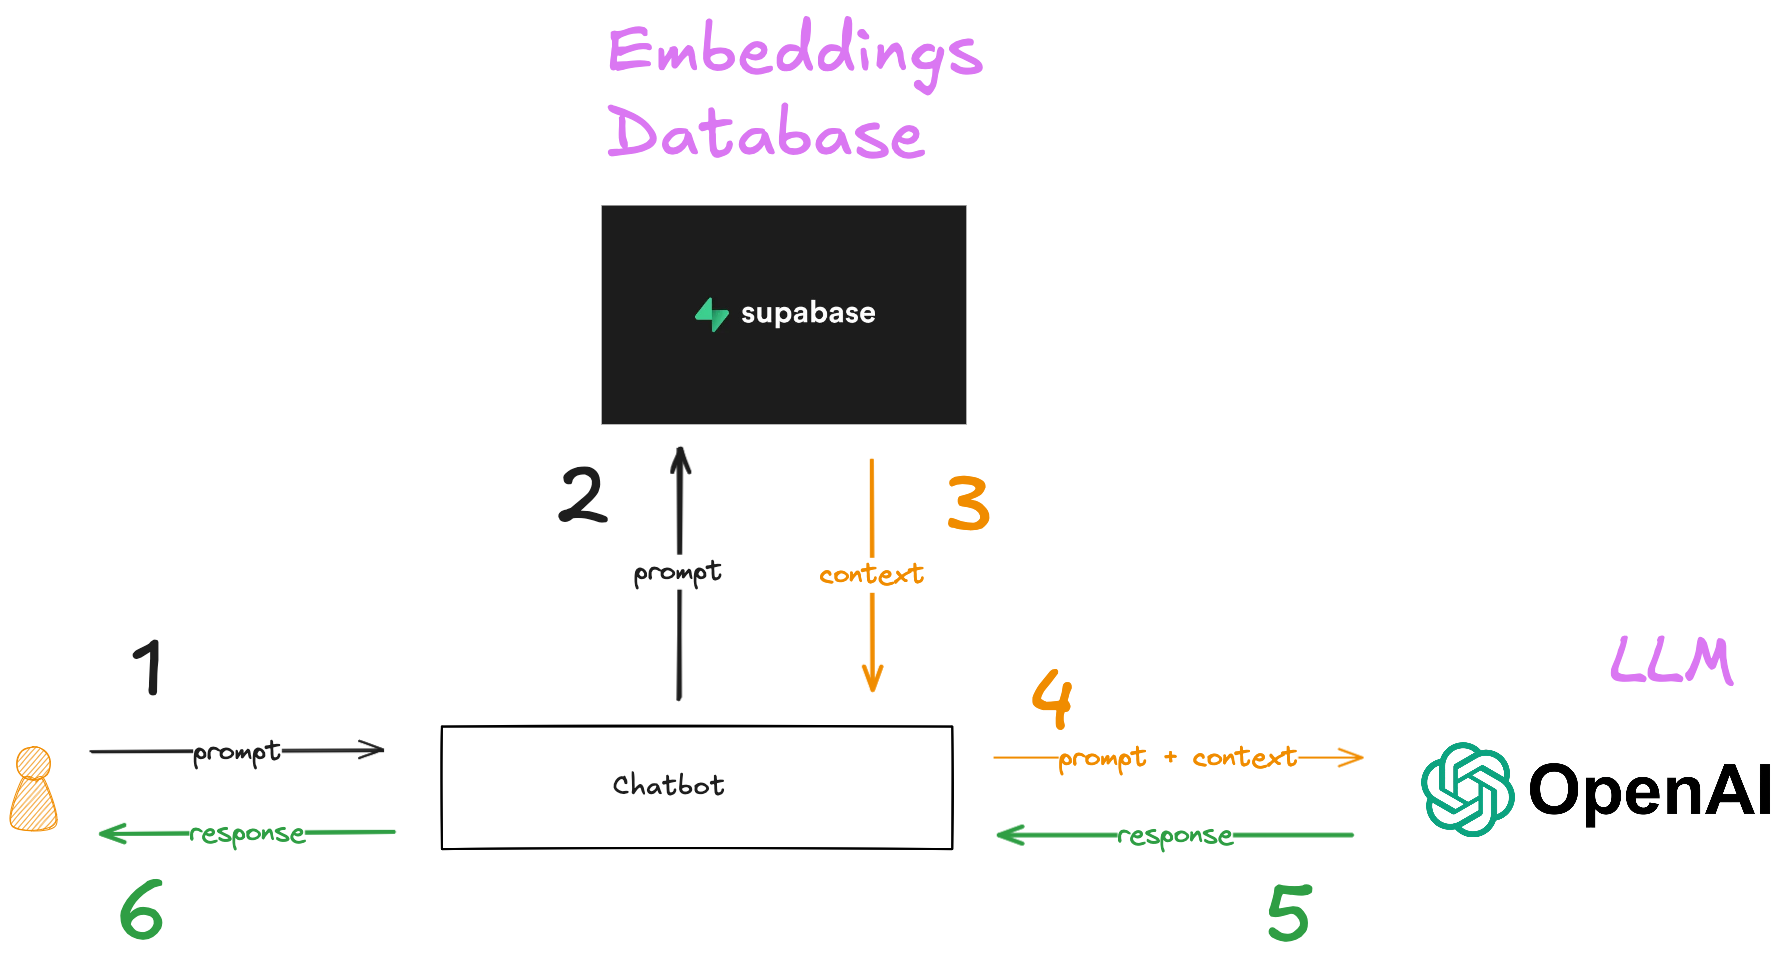
What’s missing from this is authorization. How do you make sure that you don’t send context to the chatbot that the user isn’t allowed to see?
How authorized RAG works
In order to add authorization to a RAG chatbot, you need to make sure that the access controls of the source documents are associated with the embeddings you create from those documents. Then you need to use those controls to determine what context should be provided to the user before you fetch it from the embeddings database. In this application, we’ll use Oso to handle the authorization. The final flow will look like this:
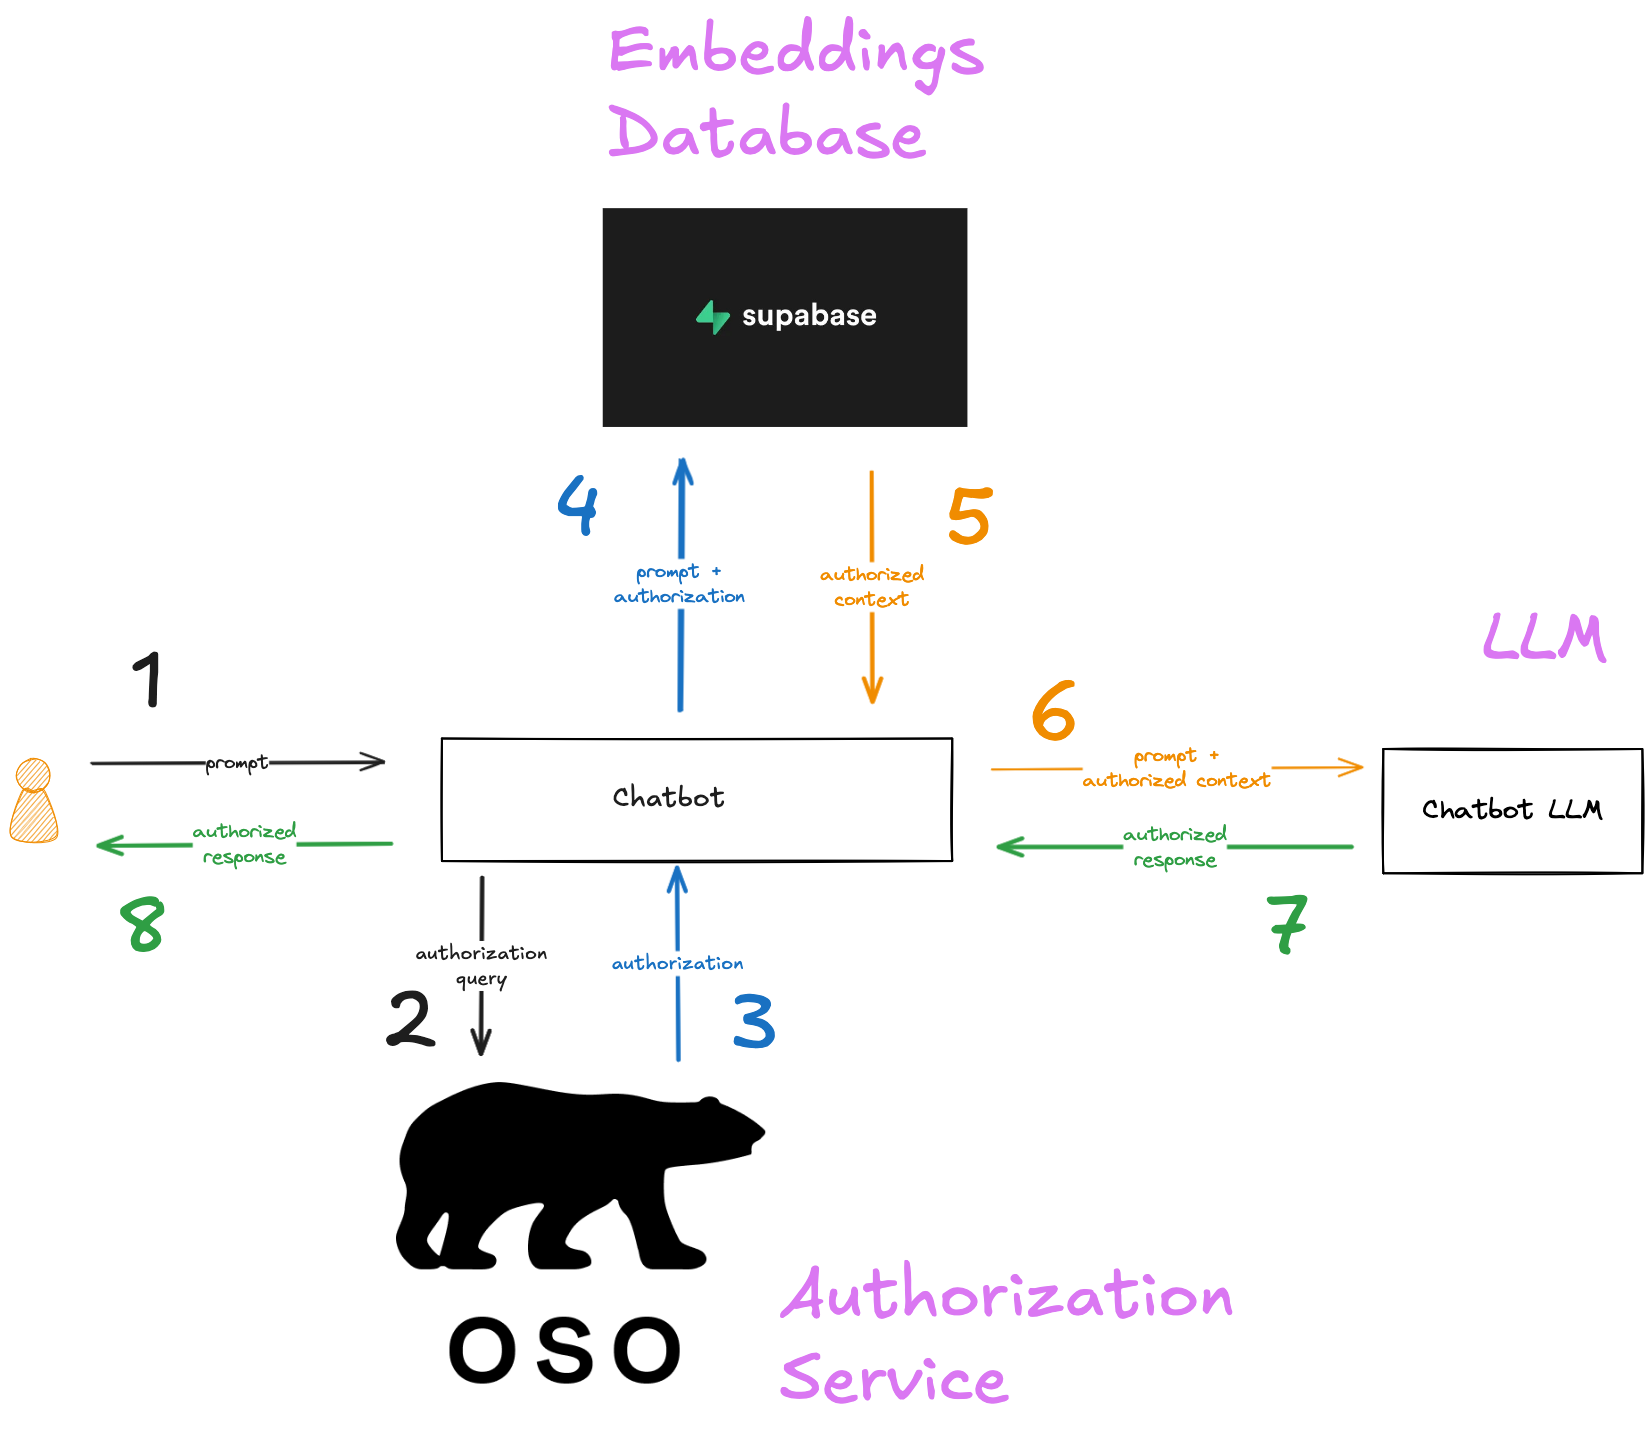
We’ll describe how each of these elements is incorporated into the demo app in the following sections.
Building the chatbot
Now that you know what we’re building and why, it’s time to get to work! In the next sections, we’ll build the chatbot step by step.
We’ll include much of the chatbot code in this post. This will show you everything you need to build a real chatbot, but it won’t be operational on its own.
If you’d like a running example, please clone the demo app repository and follow the setup instructions to get an OpenAI API key and install the prerequisites on your local system.
Initialize the database
First, you need to set up the database. If you downloaded the repository and installed the prerequisites, run supabase db reset from the repository root to create the database and load the data.
❯ supabase db reset
Resetting local database...
Recreating database...
Initialising schema...
Seeding globals from roles.sql...
Applying migration 20250312194340_initialize_database.sql...
Seeding data from supabase/seed.sql...
Restarting containers...
Finished supabase db reset on branch main.
You can inspect the schema migration and the seed data in the supabase directory of the repository. The most important thing is the first line of the migration file.
create extension if not exists "vector" with schema "extensions";
This activates the vector extension on the PostgreSQL database, which gives you access to the vector datatype. You’ll store embeddings as vector fields in the block table in the next section. It also provides the vector comparison operators that you’ll use in the similarity searches that fetch the context that is most relevant to a user’s question.
create table "public"."block" (
    "id" integer not null default nextval('block_id_seq'::regclass),
    "document_id" integer,
    "content" text not null,
    "embedding" vector
);
Populate vector embeddings and configure the authorization service
Enter npm run initialize to finish setting up the chatbot. This does 3 things:
- Add the embeddings to the embeddings database
- Load the authorization policy into Oso Cloud
- Load the authorization data into Oso Cloud
The rest of this section describes these steps in detail.
Chatbot CLI definition
The chatbot is a command-line interface (CLI). The CLI is defined in cli.js.
const cli = new Command();

cli
  .name('oso-rag-chatbot')
  .description('Demo app to illustrate authorizing RAG chatbot responses with Oso Cloud.')
  .version('0.0.1');

cli
  .command('initialize')
  .description('Initialize the database and Oso Cloud environment')
  .action(() => initialize());

cli
  .command('start')
  .description('Start the chatbot')
  .action(() => start());


cli.parseAsync();
We’re using the commander npm package to define the CLI. It defines two entrypoints:
initialize: Populates the vector embeddings and the Oso Cloud environmentstart: Runs the chatbot and listens for prompts from the user
When you enter npm run initialize , it invokes the initialize() function to finish setting up the chatbot.
Add the embeddings to the embeddings database
The addVectorEmbeddings() function uses OpenAI to generate vector embeddings for the data in the block table.
export async function addVectorEmbeddings(){
  const blocks = await prisma.block.findMany()

  for (const block of blocks){
    const embedding = await generateEmbedding(block.content);

    await prisma.$executeRaw`
      UPDATE block
      SET embedding = ${JSON.stringify(embedding)}::vector
      WHERE id = ${block.id}
    `;
  }
}
It calls generateEmbedding(), which converts plain text to a vector embedding. It’s defined in llm.js. Let’s take a look at that function.
export async function generateEmbedding(prompt) {
  const embeddingsModel = 'text-embedding-3-small'

  // This is the call to the openAI model that generates the embedding
  const embedding = await openai.embeddings.create({
    model: embeddingsModel,
    input: prompt,
  }).then(response =>
    // extract the embedding from the JSON response
    response["data"][0]["embedding"]
  );

  return embedding
}
The embedding model is text-embedding-3-small, which is more than enough for the demo app.
Now that the database is loaded, it’s time to configure Oso Cloud.
The ORM aficionados in the audience will have noted that I used an ORM (Prisma) to execute raw SQL. This will be a recurring theme. I’m an old sysadmin, and every time I try to use an ORM I spend a day or two fighting with how it expects me to express SQL. Then I give up and figure out how to get it to just let me write SQL.
Thankfully, we’re here to learn how to write a chatbot, not how to use an ORM!
Load the authorization policy into Oso Cloud
Next, you need to load the authorization policy into Oso Cloud. The policy is defined in authorization/policy.polar.
global{
  roles = ["hr"];
}

actor User{}

resource Team{
  roles = ["member"];
}

resource Folder{
  roles = ["viewer"];
  permissions = ["view"];
  relations = { team: Team };

  "viewer" if "member" on "team";
  "viewer" if global "hr";
  "viewer" if is_public(resource);

  "view" if "viewer";
}
An introduction to Polar is beyond the scope of this post. Briefly, this policy says that a user has permission to view a block if:
- They are in HR
- OR they are a member of the team that owns the folder that contains the block
- OR the folder that contains the block is public
Authorization operations are defined in authz.js. The loadPolicy() function uses the oso.policy() command to upload the policy to Oso Cloud.
async function loadPolicy(){
  const policy = fs.readFileSync('./authorization/policy.polar',
    { encoding: 'utf8', flag: 'r' });

  await oso.policy(policy);
}
Now that the policy is in place, you can load the authorization data.
Load the authorization data into Oso Cloud
Oso represents data as facts. Facts are a prescriptive but flexible format that is optimized for storing authorization data. For the demo app, you’ll store two types of data as facts in Oso Cloud:
- Which users belong to which teams
- Which folders belong to which teams
In this scenario, Bob is on the Engineering team and his public review is in the Engineering folder (our hypothetical company practices radical transparency).
Diane is on the HR team. Bob’s private review is in the HR folder, so Diane can see it but Bob can’t (radical transparency, not ludicrous transparency).
The facts are defined in data/facts.json and loaded by the addFacts() function, which uses oso.insert() to add the facts to Oso Cloud.
import { facts } from "./data/facts.js";

async function addFacts(){
  for (const fact of facts) {
    await oso.insert(fact);
  }
}
Great! The chatbot is initialized. Now it's time to make it functional.
Step 1: Identify the user and listen for questions
The chatbot’s first job is to identify the user and listen for questions. It does this when you enter npm start from the command line. It uses the inquirer package to define the prompts that our chatbot sends to the user.
// Step 1: identify the user and listen for questions
async function start(){
  const userPrompt = {
    type: 'input',
    name: 'username',
    message: 'Who are you?',
  }

  const user = await inquirer.prompt(userPrompt)
    .then(response => response.username);

  await askQuestionsAndRespond(user.toLowerCase());

  console.log('Thank you for chatting.');
}
Our chatbot is very trusting. It just asks who the user is and accepts their response as the truth. Once the chatbot identifies the user, it calls askQuestionsAndRespond() to start listening for questions.
async function askQuestionsAndRespond(user){
  const questionPrompt = {
     type: 'input',
     name: 'question',
     message: 'What would you like to ask?',
  };

  const question = await inquirer.prompt(questionPrompt)
    .then(response => response.question);

  if ( question.toLowerCase() === 'exit' ){
    return;
  }

  await handlePrompt(user, question);
  await askQuestionsAndRespond(user);
}
askQuestionsAndRespond() accepts a question, passes it to handlePrompt() for processing, and then prompts for another question. It continues to do this until the user enters exit at the prompt.
handlePrompt() is defined in app.js. It calls a series of helper functions that implement the chatbot functionality.
export async function handlePrompt(user, prompt, threshold=0.3) {
  // Step 2: Convert the user's prompt to an embedding
  const promptEmbedding = await generateEmbedding(prompt)

  // Step 3: Get an authorization filter from Oso Cloud
  const authorizationFilter = await getAuthorizationFilter(user);

  // Step 4: Get the authorized context from the embeddings database
  const authorizedBlocks = await getAuthorizedBlocks(promptEmbedding, authorizationFilter, threshold);

  // Step 5: Send the prompt and context to the chatbot
  const context = authorizedBlocks.map( block => block.content ).join("");
  const response = await generateChatbotResponse(prompt, context);

  //Step 6: Display the response
  console.log(response);
}
The function acts as an outline of the tasks the chatbot needs to do in order to provide a response to the user:
- Convert the prompt to an embedding
- Get an authorization filter from Oso Cloud
- Get the authorized context from the embeddings database
- Send the prompt and context to the chatbot
- Display the response
Let’s see how each of these works.
Step 2: Convert the prompt to an embedding
The first thing handlePrompt() does is call generateEmbedding() to convert the user’s question to a vector embedding. It’s been a while since we saw that code, so here it is again as a refresher.
export async function generateEmbedding(prompt) {
  const embeddingsModel = 'text-embedding-3-small'

  // This is the call to the openAI model that generates the embedding
  const embedding = await openai.embeddings.create({
    model: embeddingsModel,
    input: prompt,
  }).then(response =>
    // extract the embedding from the JSON response
    response["data"][0]["embedding"]
  );

  return embedding
}
Step 3: Get an authorization filter from Oso Cloud
Next, getAuthorizationFilter() uses Oso Cloud’s Local Authorization to generate an SQL filter. We’ll use that filter in the next step to make sure we only return context that the user has permission to view.
export async function getAuthorizationFilter(user) {
  const authorizationFilter = await oso.listLocal(
    { type: "User", id: user },
    "view",
    "Block",
    "id"
  );

  return authorizationFilter
}
oso.listLocal() uses a YAML configuration file to determine how to derive facts from data in your database. Let's take a closer look at how that works.
The configuration file for the demo app is located at authorization/data.yaml
facts:
  has_relation(Document:_, folder, Folder:_):
    query: SELECT id, folder_id FROM "document"

  has_relation(Block:_, document, Document:_):
    query: SELECT id, document_id FROM "block"

  is_public(Folder:_):
    query: SELECT id FROM "folder" WHERE is_public=true
Recall from the initialization section that you stored two types of facts in Oso Cloud:
- user-to-team relationships
- folder-to-team relationships
You need three more pieces of information to determine whether a user can view a given block:
- Which documents are in which folders:
has_relation(Document:_, folder, Folder:_): - Which blocks are in which documents:
has_relation(Block:_, document, Document:_): - Which folders are public:
is_public(Folder:_):
You might be wondering why we didn’t just load those three types of facts into Oso Cloud when we initialized the application. That would work just fine for this demo application, but in a production application, you could be working with a vast amount of data. If you store all the relationships between blocks, documents, and folders in Oso Cloud, then you need to keep that data up to date in two places as your users create, edit, move, and delete documents. That can get to be a lot of data going back and forth.
This is where authorization/data.yaml comes into play. It has an entry for the fact signatures that correspond to each of those pieces of information. Each entry tells the Oso Cloud client how to generate a SQL statement that returns the associated facts from your database. This lets Oso Cloud understand all those relationships without having to send the data across the wire.
You can see these SQL statements by running the chatbot with DEBUG=authz in your environment. If you do, you’ll see something like this:
  authz Authorization filter query from Oso: +0ms
  authz id IN (WITH RECURSIVE
  authz c0(arg0, arg2) AS NOT MATERIALIZED (
  authz SELECT id, document_id FROM "block"
  authz ),
  authz c1(arg0, arg2) AS NOT MATERIALIZED (
  authz SELECT id, folder_id FROM "document"
  authz ),
  authz c2(arg0) AS NOT MATERIALIZED (
  authz SELECT id FROM "folder" WHERE is_public=true
  authz )
  authz  SELECT f0.arg0
  authz FROM c0 AS f0, c1 AS f1
  authz WHERE f0.arg2 = f1.arg0 and f1.arg2 = '1'
  authz  UNION SELECT f0.arg0
  authz FROM c0 AS f0, c1 AS f1
  authz WHERE f0.arg2 = f1.arg0
  authz  UNION SELECT f0.arg0
  authz FROM c0 AS f0, c1 AS f1, c2 AS f2
  authz WHERE f0.arg2 = f1.arg0 and f1.arg2 = f2.arg0
  authz )
That’s pretty dense, and it’s not necessary to understand it to use the chatbot. What it translates to is that the query should only return blocks from folders that:
- are owned by the team the user belongs to
- OR are
public
The filter is used in the next step to limit the results of the vector similarity search that returns the context for the chatbot. Let’s look at that now.
Step 4: Get the authorized context from the embeddings database
After getting the authorization filter from Oso Cloud, handlePrompt() calls getAuthorizedBlocks() to fetch the context that:
- is most relevant to the user’s question
- AND the user is allowed to see
export async function getAuthorizedBlocks(promptEmbedding, authorizationFilter, threshold){
  // Get the ids of the blocks that this user is allowed to view
  const blockIdRows = await prisma.$queryRawUnsafe(
    `SELECT id FROM block WHERE ${authorizationFilter}`
  );

  // Convert the blockIds to a Prisma type that can be appended to the similarity search
  const blockIds = blockIdRows.map( row => Prisma.sql`${row.id}::integer` );

  // Restrict the similarity search to blocks this user is allowed to view
  const authorizedBlocks =
    await prisma.$queryRaw`SELECT
        id,
        document_id,
        content,
        1 - (embedding::vector <=> ${promptEmbedding}::vector) as similarity
      FROM block
      WHERE id IN (${Prisma.join(blockIds)})
      AND (1 - (embedding::vector <=> ${promptEmbedding}::vector)) > ${threshold}`;

  return authorizedBlocks
}
First, you select the IDs of the blocks that the user is allowed to see. Then you append those IDs to the WHERE clause of the similarity search to constrain the results.
The <=> operator may be unfamiliar if you haven’t done a vector comparison with pgvector before. It compares the vectors on either side of the operator and returns the cosine distance between them. You calculate the cosine similarity by subtracting the cosine distance from 1.
While I’m doing callouts, do you see that bit where I convert the `blockId` rows to a type that Prisma understands?const blockIds = blockIdRows.map( row => Prisma.sql${row.id}::integer );
This is the kind of thing I’m talking about with ORMs. How is this better than writing SQL? Why do we choose to live this way? I’ll never understand.
The query returns the rows that contain the context that the user is authorized to see. You can confirm this by running the demo app with DEBUG=main in the environment. Let’s try it. When Bob uses the chatbot, you’ll see this:
✔ Who are you? Bob
✔ What would you like to ask? Why did Bob get a bad review?
  main I'll send the following additional context: +0ms
  main (Similarity: 0.412) Bob should work on being more collaborative. +1ms
  main (Similarity: 0.355) Bob should contribute more to design and architecture discussions. +0ms
When Diane uses it…
✔ Who are you? Diane
✔ What would you like to ask? Why did Bob get a bad review?
  main I'll send the following additional context: +0ms
  main (Similarity: 0.548) Alice says that Bob is horrible to work with +0ms
  main (Similarity: 0.412) Bob should work on being more collaborative. +0ms
  main (Similarity: 0.355) Bob should contribute more to design and architecture discussions. +0ms
You’re almost there! Now all you have to do is send that context along with the prompt to the chatbot to get our response.
Step 5: Send the prompt and context to the chatbot
The generateChatbotResponse() function sends the user’s question and the supporting context to OpenAI to get a response.
export async function generateChatbotResponse(prompt, context){
  const completionsModel = 'gpt-4o-mini'

  // The developer prompt tells the chatbot how to behave,
  // provides information about the data it's receiving,
  // and supplies the RAG context (if any)
  const developerPrompt = `
    You are a very enthusiastic HR representative who loves
    to help people!

    Given the following sections from the company
    handbook and internal documents, answer the question using
    that information as the primary source.

    You can supplement the information in the context sections
    with general information that you know, but be sure to distinguish
    internal information from external information in your response.

    If you are unsure and the answer is not explicitly written
    in the information you have, say
    "Sorry, I don't know how to help with that."

    Context sections:
    ${context}

    Answer in conversational prose.
`

  // This is the call to the openAI model that generates the chatbot response
  const response = await openai.chat.completions.create({
    model: completionsModel,
    messages: [
      { role: "developer", content: developerPrompt },
      { role: "user", content: prompt },  // the user prompt is the question that the user asked
    ],
    store: true,
  });

  return `${response.choices[0].message.content}\n`;
}
This is similar to generateEmbeddings(). It submits a prompt to an OpenAI model and gets a response. The differences are:
- It uses
openai.chat.completions.createto generate the response - It uses the
gpt-40-minimodel - The model accepts a
developerprompt, which tells the chatbot how to behave and provides the RAG context - The response is returned as plaintext rather than a vector
If you cloned the repository, you can change the last sentence of the developerPrompt to change the way the chatbot responds. You could try things like Respond in a Shakespearean sonnet or Respond in the style of a pre-flight safety announcement. It’s your chatbot - have some fun!
Now all that’s left to do is show the response to the user.
Step 6: Display the response
In our CLI chatbot, we just write the chatbot response to the console with console.log(response). Let’s see how the chatbot responds to our users.
Bob:
✔ Who are you? Bob
✔ What would you like to ask? Why did Bob get a bad review?
It sounds like Bob received a bad review primarily because he needs to work on
being more collaborative with his teammates. Additionally, it's mentioned that
he should contribute more to design and architecture discussions. This suggests
that there might be a perception of him not fully engaging with his peers or not
sharing his insights during important discussions.

It's great that Bob has the opportunity to improve in these areas!
Collaboration and active participation can tremendously enhance team dynamics
and project outcomes. If he focuses on these points, it could lead to a much
more positive evaluation in the future!
Diane:
✔ Who are you? Diane
✔ What would you like to ask? Why did Bob get a bad review?
It sounds like Bob received a bad review due to some feedback surrounding his
collaboration skills and participation in team discussions. Specifically, Alice
mentioned that he is "horrible to work with," which suggests there may be issues
in how he interacts with his colleagues. Additionally, it was noted that Bob
should work on being more collaborative and contribute more to design and
architecture discussions. This feedback indicates a need for improvement in
teamwork and engagement in key areas of the project. It's important for Bob to
take this feedback constructively and consider ways he can enhance his
contributions and relationships within the team! 😊
And you’re done! You’ve built a chatbot that uses context from internal documents without leaking confidential information.
Wrapping up
When incorporating internal documents into LLM applications, it’s important to retain the access controls on those documents so the chatbot doesn’t break confidentiality. In this post, we did just that by using Oso to authorize context embeddings before sending them to a RAG chatbot.
Download the full demo from GitHub and give it a try for yourself! If you have any questions about the demo, authorization in RAG applications, or anything else about authorization, join us in Slack. We’re always happy to talk.
Maybe you can even help me understand ORMs.