There are a few ways to get started with Oso depending on your situation. Setting up for yourself: Run the installer on your machine. It configures your coding agents and registers your device in a few minutes. Follow the steps below. Deploying across your organization: Use your MDM to deploy Oso across all employee devices at once. See Managed Deployment. Monitoring web-based agents: Install the Oso browser extension to capture sessions from Claude.ai, ChatGPT, and Gemini. See Browser Extension.
Get started with Oso by running the installer. It configures your coding agents to route traffic through Oso and registers your device. You will:
  1. Get your Environment ID.
  2. Run the Oso installer to configure your tools and register your device.
  3. See agent activity in your Oso for Agents dashboard.

Step 1: Get your Environment ID

  1. Go to ui.osohq.com and log in.
If you are a new user, create an Oso for Agents tenant when prompted.
  1. Click your organization name in the bottom-left corner and select Organization settings.
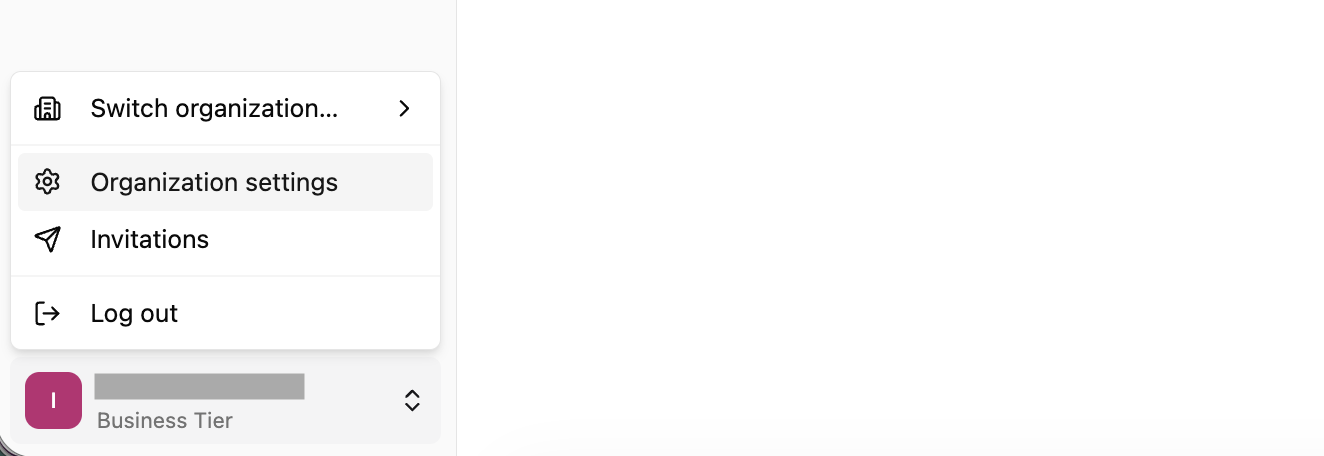
Organization settings in the Oso UI
  1. In the settings panel, click the Environments tab.
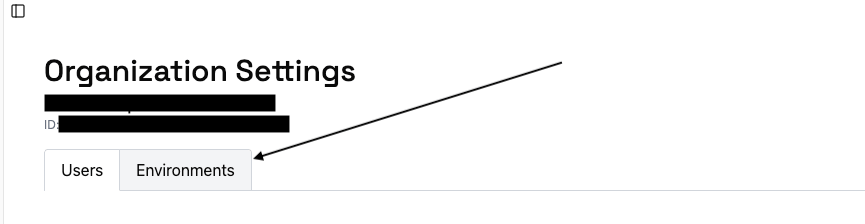
The settings panel
  1. Copy the Environment ID for your environment.
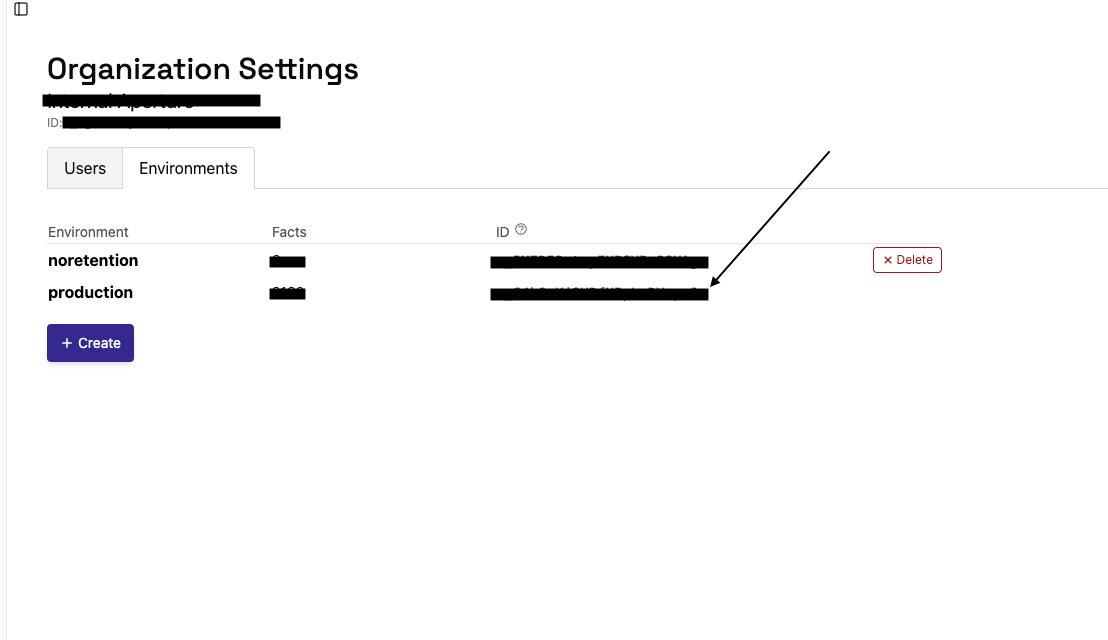
The Environments page showing the Environment ID

Step 2: Install and configure

Run the Oso installer in your terminal:
curl -fsSL https://install.osohq.com/install.sh | sh
To install globally on the device, run with sudo sh instead:
curl -fsSL https://install.osohq.com/install.sh  -o /tmp/install.sh && sudo sh /tmp/install.sh
The installer will prompt you for your Environment ID (from Step 1) and your email address, then automatically configure your tools and register your device with Oso. It also prompts for a device registration key — leave this blank, since Oso Cloud doesn’t require one.
% curl -fsSL https://install.osohq.com/install.sh | sh
Downloading Oso installer...
Installing user-level configurations.

 Oso environment ID · e_....
 Email address · example@email.com

  Verifying environment... done

 Tools to configure (space to toggle, enter to confirm) · Claude Code, Cursor, Codex, Chrome, Claude Desktop Plugin, Safari
  Downloading oso-setup... done
  Downloading oso-hook... done

Configuring Claude Code...
Configuring Cursor...
Cursor hooks already configured, skipping.
Configuring Codex...
Codex configured to route through https://agents.osohq.cloud.
Configuring Chrome...
Chrome native messaging host installed.
Configuring Claude Desktop Plugin...

Claude Desktop plugin packaged at /Users/jordansinger/oso.plugin.

To install:
  1. Open Claude Desktop Customize Plugins
  2. Upload /Users/jordansinger/oso.plugin

Configuring Safari...

Installation complete!

What the installer configures

The installer prompts you to select which tools to configure. By default all are selected.
ToolConfig file
Claude Code~/.claude/settings.json
Cursor~/.cursor/hooks.json
Codex~/.codex/config.toml
Chrome~/Library/Google/Chrome/NativeMessagingHosts/com.osohq.oso
Github Copilot~/.copilot/hooks/oso.json

Manual configuration

If you prefer to configure tools by hand, expand the sections below.
Add the following hooks block to ~/.claude/settings.json, replacing <path-to-home> with your home directory (e.g. /home/yourname or /Users/yourname):
{
  "hooks": {
    "UserPromptSubmit":   [{"matcher": "", "hooks": [{"type": "command", "command": "<path-to-home>/.local/bin/oso-hook", "timeout": 5}]}],
    "PreToolUse":         [{"matcher": "", "hooks": [{"type": "command", "command": "<path-to-home>/.local/bin/oso-hook", "timeout": 5}]}],
    "PostToolUse":        [{"matcher": "", "hooks": [{"type": "command", "command": "<path-to-home>/.local/bin/oso-hook", "timeout": 5}]}],
    "PostToolUseFailure": [{"matcher": "", "hooks": [{"type": "command", "command": "<path-to-home>/.local/bin/oso-hook", "timeout": 5}]}],
    "Stop":               [{"matcher": "", "hooks": [{"type": "command", "command": "<path-to-home>/.local/bin/oso-hook", "timeout": 5}]}],
    "SubagentStop":       [{"matcher": "", "hooks": [{"type": "command", "command": "<path-to-home>/.local/bin/oso-hook", "timeout": 5}]}]
  }
}
If you previously routed Claude Code through the Oso proxy with ANTHROPIC_BASE_URL, remove it from your settings.json env block. Hooks capture the same activity, and keeping both produces duplicate events.
Create a model provider configuration in ~/.codex/config.toml:
model = "gpt-5.4"
model_provider = "oso"

[model_providers.oso]
name = "Oso"
base_url = "https://agents.osohq.cloud"
requires_openai_auth = true

[model_providers.oso.http_headers]
OSO_ENVIRONMENT = "<your-environment-id>"
X-Identity = "|<your-email>"
Replace <your-environment-id> with the Environment ID from Step 1. Enter your email into the X-Identity header to allow Oso to correlate sessions with a specific user.
If you have OPENAI_BASE_URL set as an environment variable, unset it so the model provider configuration takes effect.
Create ~/.copilot/hooks/oso.json with the following content, replacing <path-to-home> with your home directory (e.g. /home/yourname or /Users/yourname):
{
  "hooks": {
    "UserPromptSubmit": [{"type": "command", "command": "<path-to-home>/.local/bin/oso-hook --agent github-copilot", "timeout": 5}],
    "PreToolUse":       [{"type": "command", "command": "<path-to-home>/.local/bin/oso-hook --agent github-copilot", "timeout": 5}],
    "PostToolUse":      [{"type": "command", "command": "<path-to-home>/.local/bin/oso-hook --agent github-copilot", "timeout": 5}],
    "PostToolUseFailure": [{"type": "command", "command": "<path-to-home>/.local/bin/oso-hook --agent github-copilot", "timeout": 5}],
    "Stop":             [{"type": "command", "command": "<path-to-home>/.local/bin/oso-hook --agent github-copilot", "timeout": 5}],
    "SubagentStop":     [{"type": "command", "command": "<path-to-home>/.local/bin/oso-hook --agent github-copilot", "timeout": 5}]
  }
}
GitHub Copilot hooks can only be installed at the user level. There is no global configuration directory for Copilot, so root/system-wide installation is not supported.

Step 3: Monitor agent activity in the Oso dashboard

Use your coding agents as normal. Activity will appear in your Oso for Agents dashboard.

Uninstalling

Run oso-setup uninstall the same way you installed - without sudo for a user install, or with sudo if you ran the installer as root.
# User install
~/.local/bin/oso-setup uninstall

# Global install (if you ran with sudo)
sudo /usr/local/bin/oso-setup uninstall
For shared config files (Claude Code, Cursor, Codex), only Oso’s own entries are removed, while your other settings are left intact. Files that Oso owns outright (Chrome and Firefox native-messaging manifests, the GitHub Copilot hook, the Claude Desktop plugin, etc.) are removed entirely. The uninstaller also removes your identity file, debug logs, and the oso-hook and oso-setup binaries. It’s safe to run more than once. For the Claude Desktop Plugin, you must separately remove it through Claude Desktop → Customize → Plugins. Pass --keep-logs to retain oso-hook debug logs:
~/.local/bin/oso-setup uninstall --keep-logs
# or
sudo /usr/local/bin/oso-setup uninstall --keep-logs

Next steps

  • Shadow AI: Discover what AI agents are in use across your organization.
  • Session Monitoring: See what agents are doing inside their sessions.
  • Alerts: Set up monitoring for unsanctioned usage and sensitive content.
  • Managed Deployment: Deploy Oso across your organization via MDM or IT policy.
  • Other integrations: Network-level and endpoint-based discovery via EDR or Tailscale Aperture.